I was looking for ways that I could host my small, work in
progress, genealogy website for free. All the options seemed to have negatives
that outweighed the positives, or had limited storage amounts and no guarantee
of long term hosting. Then I remembered Github pages. This will be a full
tutorial on how to do what I did for complete beginners. It will assume you
have a website generated by your genealogy program. (I recommend GRAMPS as a
good free program.)
The end result will be something like this (my website):
What is Github?
Github is a code sharing website. It is mainly for
open-source projects, which means projects where the code is free for viewing
by anyone who wants to. This is the link
to the github homepage: https://github.com/ .
Getting Your Github Account
Simply go to github and create a free account, Its that easy!
Installing Everything You Need
Downloading GIT
GIT, unfortunately, does not work with just the website. You
will need to install an application on your computer in order to get it to
work.
First go to the following link: https://git-scm.com/downloads
Click on the operating system that you are working on. In my
case its windows so I clicked the “Windows” button.

It will automatically download once you click. Next you have to run the installer. Just click on the downloaded file and do what it says. That's all you need to do for this section!
Setting Up Your First Repository
Don't worry it's not as hard as it sounds. Got to the Github home page and scroll down all the way. In the bottom right hand corner you should see something that says "your repositories" and next to that there will be a button that says "create new repository". Click the button.

You should now be on a screen that looks like this:

You Should now be on a page that looks like this:


You will be directed to a list of settings. You don't need to worry about any of these, but feel free to check them out if you are interested. But, if you go back to the Github pages button, you'll now see something that says: "Your site is ready to be published at" followed by the name of your website. If you click it it will look something like this:
Pretty boring right now but we'll fix it up in the next step.

Adding Your Content
Prerequisites
Before you do this step I'm assuming the following :
- You have your website saved in a folder. If you want to follow this tutorial exactly save it in your "Pictures" Library on windows in a folder called "Website2"
- You have completed all the previous steps succesfully
Prepping Your Website Files for Uploading
First start up git bash. It was installed with the GIT install you completed earlier. You will be met with a screen that looks like this:

This is called a "terminal". You use terminals to send commands to your computer. In this case we will be telling our computer that we want our website files to be uploaded to git. Since I've already made my family website I will be using a mostly blank html file to upload to my new website, so it will not be exactly the same as what you see but should be close.
Next you have to navigate to the folder your website is saved in. I have mine saved in "Website2" which is in my pictures library. We will use a command to get there. That command is "cd". cd stands for "change directory". Each of our folders on our computer counts as a directory, but individual files, like pictures do not.
Here are the commands to get to the folder:
- cd Pictures
- cd Website2

Now make sure you are in the right directory. Type "ls" to see the files inside.
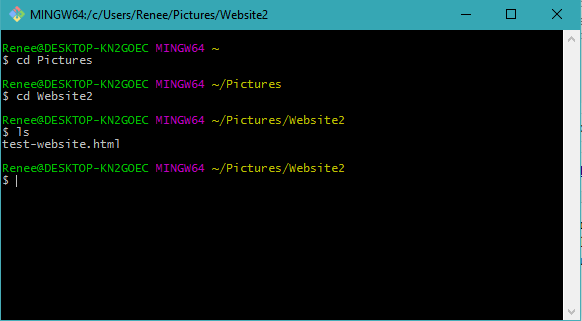
Yours will have many more files than mine does. Now that that's taken care of we need to tell our computer that the folder is a git repository. to do this we type "git init"

The folder now has (master) beside it in blue text.
Next go to back to your online repository page and copy the link. go back to the terminal and type:
git remote add origin "link you just copied without the quotes"
It will look like this:
Then type: git add *
Next type: git commit -m "Website file upload" *
This will make whats called a "commit", which is basically a change to the repository. The change we made was uploading our website files, so we added an explanation saying "Website file upload". The star uploads all the new files.

finally
type: git push -f origin master
This is the only time you will do this. It deletes everything in the online repository and uploads the stuff in the folder on your computer.

Now go back to the URL of your website and you will see that its up and running!
I'll make another post in the future to show how to update your new website.
No comments:
Post a Comment