 |
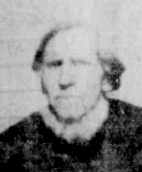
| Original Photo |
 |
| Restored Photo |
As some of you know already, I am an IT major at Marymount University. Recently I have developed a persistent interest in machine learning and artificial intelligence, so you can imagine my excitement when I discovered a tool that incorporates these exciting and constantly developing fields with my other interest- genealogy.
The tool is called GFPGAN and its stated purpose is as a Practical Algorithm for Real-world Face Restoration.
Now before I begin nerding out on all the cool features and advanced ways you can use this tool, I want to drop a couple links that will make using the tool infinitely easier for those of you who -well- just want to use it. These online demos will let you try out the tools without going through a bunch of complicated steps.
Option 1:
 |
| The Hugging Face Online Demo |
Pros:
- Free
- Will probably remain free
- Doesn't require you to login
Cons:
- Only returns cropped versions of the faces in the photos
Option 2:
 |
| The Replicate Online Demo |
Pros:
- Free
- Returns the full photo
Cons:
- May not remain free (they may decide to charge for processing power in the future)
- You may need a github account to use it. Luckily github is free and a popular and trustworthy site used by software developers globally.
Running Tests On My Own Photos
For this section I will be using the replicate online demo of GFPGAN since I assume that is what most people reading this post would like to use. It should be noted that because this tool is open source with all code and training models available online it is highly customizable for those of you more technically inclined. However, the Demo results in high quality and consistent results from my experience testing it and should work well for the average user.
The picture at the top of this article is of my 4th great-grandpa Johann Peter Toenges. It was the first picture I decided to test the tool on. The picture as you can see has a lot of problems. I got it from an online scan of a newspaper containing his obituary. Features are hazy, but not totally obscured. The contrast is extremely high. This is a choice a lot of online newspaper scanning companies make on purpose because it makes text more readable. However, in the case of pictures it results in detail loss. this was a picture I fully expected to fail, yet it returned an image that looks like it is probably a more accurate depiction of my ancestor than the blurry and damaged original.
So after it passed that first task with ease, I decided to try it out on some of my other photos, each of varying quality.
Stress Test: Many Many Very Blurry Faces
The photo below is of a group of people posing for a photo after a barn fire at my 3rd great Grandpa Lewis Burnes'. A note on the back says he is the first one to the right with the hat on.
 |
| Original Photo |
 |
| Restored |
Now I wondered if the tool would perform better if I included just the face of Lewis Burnes, however the results were essentially identical suggesting that the number of faces wasn't actually the problem, but rather the lack of detail in the photo was to blame.
I decided to try one more test with this particular photo. I know I am a fairly adept photo restorer myself without the use of AI- and I wondered if the AI would handle the photo better after I used some of my photoshop skills to make some simple clarity improvements.
 |
| My Edited Version of the Photo |
 |
| Attempted Restoration of the Edited Version |
The faces produced from this attempt do have more readability as human faces, however they are still obviously different from the source material. It's possible that if I were to put more time and effort into my own manual restoration of the photo it may slightly improve the results.
Testing On a Variety Of Photos
After my initial limits testing I decided to attempt to use the tool on a wide variety of my old photos. As I tried more and more, I found that it was becoming clear that the tool on its own wasn't necessarily equipped to handle the specific challenges that 100+ year old photos pose. I made the following observations that should help you finish with a cleaner product (note some of these things can be fixed by manually editing photos):
- Dramatic shadows or overexposure result in distortion.
- Scratches, dust, mold marks and physical imperfections of the paper the photo was on would sometimes alter the final facial rendering.
- Paper texture can sometimes result in a rendering where wrinkles have been added to a person who would not have wrinkles.
- It seems to excel with correct renderings of ears- something that can be extremely useful in photo subject identification since the shape of ears tend to be somewhat unique and aren't overly affected by a person's age.
- It also seems to excel in sharpening and texturing of facial features which can result in a photo that has a high definition appearance.
- A head turned at 3/4 view or more is less likely to turn out realistically.
Now here are some samples of photos I ran through the tool (very little to no editing done beforehand) and the final generated images:


As you can see the changes are often subtle but more often than not result in a visible improvement. While I was testing GFPGAN with the default settings ideas to improve its results for old photographs kept popping in my head. Unfortunately my GPU (a computer part that is very important for this type of programming) recently died and it is near impossible to get a new one right now for reasons I won't burden you with here. However, I am very excited for the possibility of modifying GFPGAN to my own tastes in the future and see what I can get it to accomplish. If anything fruitful comes of my efforts I will be sure to share on this blog in the future.
How Does GFPGAN Work?
Now for the fun part (for me anyways). I am going to assume that most of my readers are more well versed in genealogy than technology, so this may be a bit repetitive or oversimplified if you are already well versed in machine learning technology. I'm hoping I am able to successfully make understanding this technology accessible to everyone. If you want to look deeper into the mechanics you can look at the project page of the tool on github here: https://github.com/TencentARC/GFPGAN. If you want something even more in depth you can read the academic research paper associated with the project here: https://arxiv.org/abs/2101.04061.
Machine Learning Processes: What is a GAN?
GAN stands for Generative Adversarial Network and is a fairly new machine learning technique that was first successfully implemented in 2014. It is the model employed in GFPGAN. To understand how GANs work lets step away from the idea of machines and technology for a moment and instead pretend that we are talking about two siblings- Bob and Jill.
The Story of Bob and Jill
Our two heroes are in fact master criminals. Bob and Jill have decided to run a massive art counterfeiting operation, or at least try to, with the diabolical ambition of trying to convince the world they have found a lost archive of never-before-seen art from the world-renowned and long dead artist Leonardo da Vinci. Bob is an artist of the highest caliber, but disillusioned with his lack of critical success he enlists his sister Jill (an art history fanatic who has a knack for identifying counterfeited art) to help him deceive the world.
Every day Bob paints a painting. Every day Jill does her very best to pull the painting apart, telling Bob in agonizing detail every mistake in his reproductions that betray their false origins. In a sibling rivalry that grows almost biblical in pettiness Jill continues to derive a perverse joy from informing her brother of his technical failings and Bob becomes increasingly determined to fool his sister.
Then one day Bob succeeds. He presents a painting to Jill and she can not find a single inconsistency. She tries and tries but there is no discernable difference between the techniques Bob used to create this completely original image and the previous authenticated works of Leonardo da Vinci.
Together they successfully fool the world becoming the first ever bajillionaires with no one being the wiser.
What do Bob and Jill Teach Us About GANs?
Now, lets backtrack a bit to machine learning. The general rule for most machine learning programs is that you start with a "training set" of data to teach your model how to identify, classify, or generate data that fits certain rules.
In our example we have 2 machine learning models. The model we called Jill was initially trained using paintings made by da Vinci. She identified attributes of the paintings that allow her to say "This is a painting made by da Vinci". She starts with a result produced by Bob and using what she knows about da Vinci she comes to a conclusion about what data (the painting) she has been given. In machine learning she would be called the discriminative model.
The model we called Bob was given a base task, to paint a painting that looks like a da Vinci. He doesn't have the knowledge about da Vinci's technical methods that his sister Jill has, so he has to start by making approximations and guesses. Every time he paints a new painting he sends it to Jill for analysis and she critiques him, telling him what attributes of his work lead her to conclude it was counterfeit. In machine learning Bob would be called the generative model.
With the two warring models attempting to outwit each other, the generative model becomes better at it's initial task and, eventually, may start to fool the discriminative model. This is how GANs "learn" and improve.
So How Does GFPGAN Actually Work?
This is the section where oversimplification may begin to present itself, but again I really don't want to overwhelm readers. If you have a clearer and more precise way of explaining I would love to hear in the comments!
GFPGAN uses a combination of existing tools for machine learning based photo restoration. The GAN is used to determine the right settings and balance to achieve a result that has the truest resemblance to the source's actual appearance while also producing a result that includes some degree of estimation.
No comments:
Post a Comment