When I first started doing genealogy I knew that my goal would ultimately be to write biographies for as many of my ancestors (and their families) as possible. After lots of trial, error, and research I have finally begun this process. My next several posts will be a series that will go in depth on every step I now follow when writing these biographies.
Step one: Organizing Research and Preparing Citations
This is, of course, the most important step. It's important to have documentation that supports your facts; it prevents mistakes and false assumptions from being made and allows anyone reading the biography to reference back to the original sources and verify your information. I personally use Legacy Family Tree software to organize everything. It has a very organized system for citations that makes it fairly simple to add meaningful and useful sources to your work.
Take, for example, this newspaper article:

Forest Van Wert was my 2nd great grandfather. He had a fairly short life of just 38 years, but those years were filled with excitement and stories. I absolutely love the vibrant imagery and detailed description of the dance in this article and would like to use it in my biography about him.
My first step for citing the article is to open up Legacy and add an 'event' to F. E. Van Wert's page.

Once I click the "add event" button, I am brought to the following page:

Here there is a variety of fields in which I can document the information for the newspaper clipping. The first step is to choose a category for the event. I click the downward pointing arrow to see the master list of events I have to choose from.

I actually added my own event which I will use for this called "Newspaper" that I use for newspaper mentions that don't meet the criteria of the predefined events. You could also choose to add more specific events, for example I could have instead made a new one that said "Dance" or something similar. Its up to personal preference. I fill out the description with the name of the article, and the date with the date that the article was published. Once I am done filling these out It looks like this:

Next to the event/fact box there are four icons. Clicking on the books will bring you to the screen that allows you to add a source for your event. You will see that the event you are about to write the source for is highlighted in blue. Make sure it is the right one or the source will be added to the wrong event!

Now you can click "Cite Master Source". To explain what a master source is I will use an analogy: A master source is to a citation as a book is to a page. The master source is the general resource you used to find the specific citation in. For example, lets say that I had a page from the 1910 census of Minnesota. The 1910 census of Minnesota would be my master source and the citation would be the page. I will be citing a master source for The Oak Creek Times newspaper in Colorado, which I found on this website: https://www.coloradohistoricnewspapers.org/
For this citation I select my source type as:
Newspapers > Online Images (issued by unrelated content provider)
I then proceed to fill out the fields. For the Source list name I choose: Oak Creek Times (Colorado Historic Newspapers). The name is not visible in the citation; its just there for your benefit so you want to choose something that distinguishes it from all of your other master sources. I usually Include the actual name of the source followed by the name of the website I got it from. This way if I, for instance, found parts of the Oak Creek Times newspaper online that I wanted to cite that were not from the Colorado Historic Newspapers website I would be able to add a new master source for the other website and be able to distinguish between the two.
Once I am done with the Source info tab it looks like this:

For this Master source I leave the rest of the info underneath the other tabs blank as they are not applicable.
Now it is time to write the actual citation for the Newspaper. First I select the Master source I just created. I then begin adding in the information for the specific article I selected.
I make sure that I have the original source open so that I can reference it as needed,
Once I am done with the detail information tab, this is what the filled out information looks like.

Note: I didn't add in an author for this article because no author was recognized in the newspaper. If an author were recognized then you should definitely cite the author.

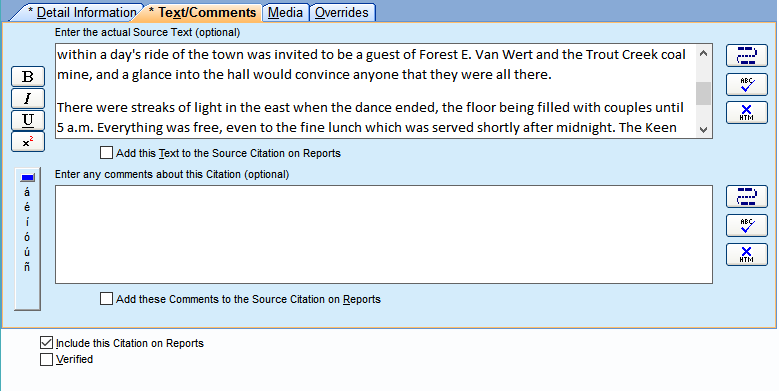
I then move on to the text/comment tab. I personally prefer to add in my transcription of all of my sources. It makes it much easier to "copy and paste" the sections you think are significant for when you are writing the biography into a revised organizational document (something I will cover later on in this series).
Now on to the media tab! Before I move on I would like to explain how I organize all of the media for my sources. Legacy Family Tree has a default media folder. In windows it is located at:
"C:\Users\(your user name here)\Documents\Legacy Family Tree\Media"
I personally prefer to keep all of media files located in this main folder. It makes it less likely that I will accidentally delete any of my important media files. Plus if I want to send my tree to a relative or fellow researcher I can easily copy the whole media folder so that its easy for them to view all my information without broken media links.
However, I don't just throw all of my media files into the media folder. I sort my files by type into their own folders. This is what my media folder currently looks like:

Some of these folders contain multiple folders inside to further organize them. For instance, in the draft card section there is a folder for every war.
In the portraits folder every photo is named according to the people inside them, the date, and the location if the information is available. This makes it easy to find all photos of any one person by performing a search in file explorer.
Using this method of organization I simply navigate to the Newspaper Article folder and add in the photo of the article.

I leave the Overrides tab blank as the citation I have just created is sufficient for the article.
Once I have completed this source I move on and complete the rest. It's important to cite every piece of information you have so that, when the time comes, you are free to focus on writing an interesting narrative for your subject.
Feel free to comment below with any tips you have for writing citations or organizing your files!
No comments:
Post a Comment